INKspired Challenge 145 - Color and Contour


Hello Stampers!  Welcome and thank you for joining another INKspired Artists challenge created by Teneale Williams.

This challenge is all about Stampin' Blends! I totally love using the Blends pens to colour in, create a bit of splatter and to use as a beautiful background like I have for my card. I will tell you more about the technique as we go along.

The focal point of this card is the background. You may have heard of the technique of using Stampin' Blends, vellum paper and alcohol (rubbing alcohol) to create some really lovely backgrounds. I randomly scribbled a pattern on a piece of vellum with dark/light Blend colours (Real Red, Mossy Meadow and Mango Melody). I then sprayed the sheet with some rubbing alcohol - mine had a solution of 100% alcohol. This is needed to activate the spread of the Blends properly.


When I liked the effect produced, I lightly dried the sheet with the Stampin' Up! heat tool. I placed it on a piece of Basic White card stock which intensified the background colours. There are some really great YouTube videos showing how to do this technique.


I found that when the Real Red Blends dried, Poppy Parade card stock matched perfectly and I wanted something a bit brighter to enhance the great flowers from the Color and Contour Stamp set. The scalloped edging is from the Scalloped Contours Dies.


The flower outline is in Poppy Parade and filled in with Mango Melody ink. I used a light Old Olive Blend pen to colour in the stem and leaves. I chose Old Olive as when the Mossy Meadow blended with the Mango Melody with the alcohol, it created a lighter and brighter green.


To pop the colours out a bit, I chose to enhance the card with one of my favorites, the crinkle white ribbon. I really do love using this ribbon, especially for bows. 


The ribbon is tucked behind the scalloped edge which I popped up with Stampin' Dimensionals for some added depth. The sentiment is from the Color and Contour Stamp set, and I chose one of the dies from the Scalloped Contours Dies set as well.


You can see I used a piece of the vellum trimmed off for the inside of my card. I used the Blend Pens to the inside to show off  how versatile they are to create a delicate splatter.

I hope you take your Blends out and use them in some great ways! They will totally enhance any card!

Thanks for having a look at my blog contribution, and leave a message if I can help you make this card or assist in getting you started in creating lovely creations for yourself!

Now it's time to hop forward to Allison McLeod's blog.  I can't wait myself!

Cheers and Happy Stamping!


INKspired Challenge 143 - Pansy Patch

 Hello Stampers!  Welcome to another INKspired Artists challenge created by Teneale Williams.

This challenge was about creating / decorating a box and or tags! Fortunately, I had some of the mini paper pumpkin boxes in my stash and this was the right opportunity to being them out and play!


I chose to use the Pansy Patch stamp set and coordinating dies to create a beautiful box and cards! These paper pumpkin boxes are perfect for holding note cards, and so easy to decorate with Stampin' Up! Designer Series Paper (DSP) and embellishments.


The Pansy Petals DSP and Pansy Dies made this project so easy and fun to do! The DSP's coordinating colours and patterns make your choices simple, and the DSP have a pattern with the large pansies that are easily cut out with the Pansy Dies. The only stamping was the sentiment for the box and the cards.

There are just so many possibilities! Check out the other Stamp sets / Bundles and DSP for the right design for you and for who you would like to make something for!


The colour coordinating Open Weave Ribbons are an excellent embellishment (soft succulent, polished pink and pale papaya used), along with the 2121 - 2023 In Color Jewels.


I hope you have as much fun in making a box full of beautiful cards, and / or a beautiful box for whatever you have in mind to put inside!


Thanks for having a look at my blog contribution, and leave a message if I can help you make this card or assist in getting you started in creating lovely creations for yourself!

Now it's time to hop forward to Teneale's blog.  I can't wait myself!

Cheers and happy stamping!


INKspired Challenge #142 - Quiet Meadow


Hello Stampers!  Welcome to another INKspired Artists colour challenge created by Teneale Williams.

I used one of the featured colours (Coastal Cabana) and combined it with Black and White in this challenge.

I have chosen to use the Quite Meadow stamp set and the coordinating Meadow Dies for a bit of a nostalgic effect, and the brighter colours just didn't flow, so here it is!


I created a torn edge card for a friend that just lost her husband. They live near us in the Australian bush, and I thought the Quiet Meadow was perfect for our setting. 


The white silhouette die cut is a beautiful sentiment in itself, however the sentiment from the Quiet Meadow set puts it all together for this sympathy card.


I layered the Coastal Cabana card stock with a piece of Basic White sandwiched in the middle, and randomly stamped the words stamp, flower and splatter stamps on the top piece. I did not use full strength black ink, but I stamped off until I got the desired amount of ink I wanted which was a worn and weathered look.

Next I tore one of the edges and roughed up the other sides, then burnished all sides with black ink and a sponge dauber. I created a heavier look to the torn edge, and added some Coastal Cabana ink to all edges here and there.

Also the sentiment cut from the Stitched So Sweetly Dies was burnished as well with both ink colours.


I added the Very Vanilla Scalloped Lace and Black Glittered Organdy Ribbon to the top two layers, and placed the white die cuts on with the liquid glue (lightly applied here and there). I splattered some Whisper White ink to the whole card front, including the base card layer.


The sentiment piece was placed on with dimensionals. I used the small dimensionals on the top and bottom to avoid sticking to the ribbon and lace, but to ensure good adherence to the card stock.

For some finishing touches, I used a silver embellishment from the Silver and Clear Epoxy Essentials, and a few Basic Rhinestone Jewels.


A simple inside to the card with room to write your own message, and use or some paper scraps for added effect. A few splatters with stamped off black and Blend pens. I find that the light Bermuda Bay Blend pen matches the Coastal Cabana card stock.

Thanks for having a look at my blog contribution, and leave a message if I can help you make this card or assist in getting you started in creating lovely creations for yourself!

Now it's time to hop forward to Katrina's blog.  I can't wait myself!

Cheers and happy stamping!


INKspired Sketch Challenge #141 - Sharing Sunshine

 Hello Everyone!  Welcome to another INKspired Artists sketch challenge created by Teneale Williams.

I actually loved the challenge this sketch gave me! I had to think way out of the box and stretch me to look in a different direction than usual.

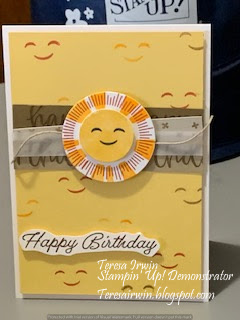
I had just got the Sharing Sunshine Stamp Set in the mail, and couldn't wait to use it! I thought circle, oh my gosh, I can do this! I also wanted to make a card that could be masculine or feminine, in saying this, I made two. The card also features the new Biggest Wish Stamp Set. So let me know what you think!


I used vellum to stamp my Sunshine for the white back ground, and Basic White card stock for the So Saffron back ground. I was basically experimenting with the Sunshine before I decided on what the rest of the cards would look like. I used the Mango Melody and Cajun Craze Inks for the rays, and So Saffron Ink for the centre.


I chose something that could be uni-sex and started using the Biggest Wish Stamp Set to decorate the Soft Suede, Crumb Cake and Grey Granite strips of card stock (in Soft Suede Ink). Then I used Mango Melody, Soft Suede and Cajun Craze Inks to randomly stamp the smiley face to the back ground.


I chose to use Mango Melody, Cajun Craze and Crumb Cake strips of card stock and decorated with the Biggest Wish Stamp Set. I thought the vellum Sunshine looked best on the White back ground and more colourful strips behind.

I just added the Happy Birthday sentiment from the Sharing Sunshine Stamp Set in Soft Suede to White cardstock and trimmed around it (set on with dimensionals).

I don't know about you, but the Sharing Sunshine Stamp Set just makes me SMILE all over!!!

Thanks for having a look at my blog contribution, and leave a message if I can help you make this card or assist in getting you started in creating lovely creations for yourself!

Now it's time to hop forward to Katrina's blog.  I can't wait myself!

Cheers and happy stamping!


INKspired Challenge #140 - Pierced Blooms

  Hello Everyone!  Welcome to another INKspired Artists challenge created by Teneale Williams.


This Challenge is all about using stripes of any kind and in any way for our cards! I do like stripes, and I will have to say I have enjoyed how Teneale has used them so creatively in the past. I decided to mix the True Love Designer Series Paper which you may have on your shelves, with the Pierced Blooms Dies! 


Along with the Dies, the beautiful bright colours of Granny Apple green, Bermuda Bay, Pool Party, Magenta Madness, Daffodil Yellow, Poppy Parade and just a little Night of Navy Card Stock were used! I really hope the colour combination with the stripes catches your eye!


I chose to stamp the sentiment 'Hello' from the Artistically Inked Stamp Set (another favourite) because I think that is exactly what this combination is saying!


The stipes continue to the inside as does the subtle splatter of colour using Magenta Madness and Bermuda Bay Blend Pens. If you haven't tried to add some splatter to your cards yet, let me try to explain how - you take the Thick tip end and just flick the ink tip from the inside of the cap. The more you try this technique, the easier it will be to apply whatever degree of splatter you desire!


Now the Pierced Blooms Dies come with so many varieties of flower and leaf sizes, and the pierced design provides just the right amount of effect without any effort! I have made so many different combinations using this Die Set, and it will be a favourite of mine for years to come.

To top it all off, I added some embellishment using the 2021-2023 In Color Jewels. The jewels come in a variety of sizes and colours to add that 'special' touch to any card!

Thanks for having a look at my blog contribution, and leave a message if I can help you make this card or assist in getting you started in creating lovely creations for yourself!

Now it's time to hop forward to Katrina's blog.  I can't wait myself!

Cheers and happy stamping!


INKspired Sketch Challenge #139 - Artistically Inked


Hello Everyone!  Welcome to another INKspired Artists sketch challenge created by Teneale Williams.

I mixed this sketch up a bit. I wanted to use the Artistically Inked stamp set, I just love this set especially the background stamp! I just couldn't get my head around this sketch at first, but Teneale gave me some simple pointers and it all just fell into place.


This one is for 'pink' lovers for sure! The new in-colours are beautiful! 
I have used Polished Pink, Pale Papaya and Soft Succulent.


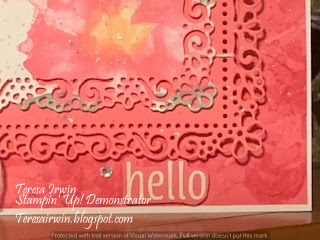
My rectangles are from the Ornate Layers dies. The filigree outline is delicate, as well as a bit classy. 


I stamped the large flower stamp in Polished Pink ink  and some leaves in Soft Succulent ink on the side of a piece of Basic White cardstock for my circle. After stamping the image, I used the smaller filigree die to cut out the focus layer. Then I gave this layer a bit of a splatter with Blends in the ink colours used.


The second layer is cut from a piece of Polished Pink card stock. The background design was made using Polished Pink Ink with the large smudge stamp on Polished Pink card stock. It produced a marbling effect.


Then I wrapped a piece of white linen thread around the second (pink) rectangle.


Next step was to layer the rectangles with dimensions. and using dimensionals again layered both on top of the basic white base.


I heat embossed the 'hello' the Art Floral stamp set in white and cut it out around the word.


I set the sentiment on the card base using small dimensionals. To finish it off, I added a few Rhinestone Basic Jewels.

I planned this card for one of my daughters who is a true pink lover.

This card could be made in almost any colour of choice.

Thanks for having a look at my blog contribution, and leave a message if I can help you make this card or assist in getting you started in creating lovely creations for yourself!

Now it's time to hop forward to Katrina's blog.  I can't wait myself!

Cheers and happy stamping!


INKspired Sketch Challenge #136 - Wildly Happy


Hello Everyone!  Welcome to another INKspired Artists sketch challenge created by Teneale Williams.
I created this card for one of my card class ladies who is having a sweet little baby girl very soon! I wanted something simple and delicate so I used the Wildly Happy Stamp set, Hydrangea Hill designer paper in Rococo Rose and the Ornate Borders dies.


The warmth of the colours seemed to match the nurturing love that this mother bunny has for her little one. The background is Soft Suede with the sentiment and image on basic white. The designer paper in a delicate subtleness in Rococo Rose goes beautifully with the Crumb Cake die cut. 


I used the Blends in Crumb Cake, Petal Pink, Bronze and the Colour Lifter. 


The white linen thread stands out over the Crumb Cake die cut. I used some of the clear epoxy droplets as embellishments.


I love all the sweet animals in this stamp set, but the mother and baby were the perfect choice for a new Mum and her baby.


The designer paper reminds me of my grandmothers quilt squares, something that would line her linen shelves. Of course, the substitution of a blue could work for a little baby boy too!


I used a strip of Crumb Cake over a strip of edging die cut from the same designer paper as an added delicate touch. Of course, I just had to top it off with a little splatter of Rococo Rose and Crumb Cake Blend pens.


I can't wait to give the card and a little gift to the new Mum and her baby!

Thanks for having a look at my blog contribution, and leave a message if I can help you make this card or assist in getting you started in creating lovely creations for yourself!

Now it's time to hop forward to Katrina's blog.  I can't wait myself!

Cheers and happy stamping!